【WordPress】Advanced Custom FieldsのGoogleマップ機能の使い方

Googleマップ機能の使い方
基本的には「Advanced Custom Fields」の公式サイトに記述されている通りに設置すると実装することができます。
ただ普通のカスタムフィールドとは違い、CSS、PHP、JavaScriptを設定する必要があります。
公式サイトはこちら → ACF | Google Map
フィールドの追加
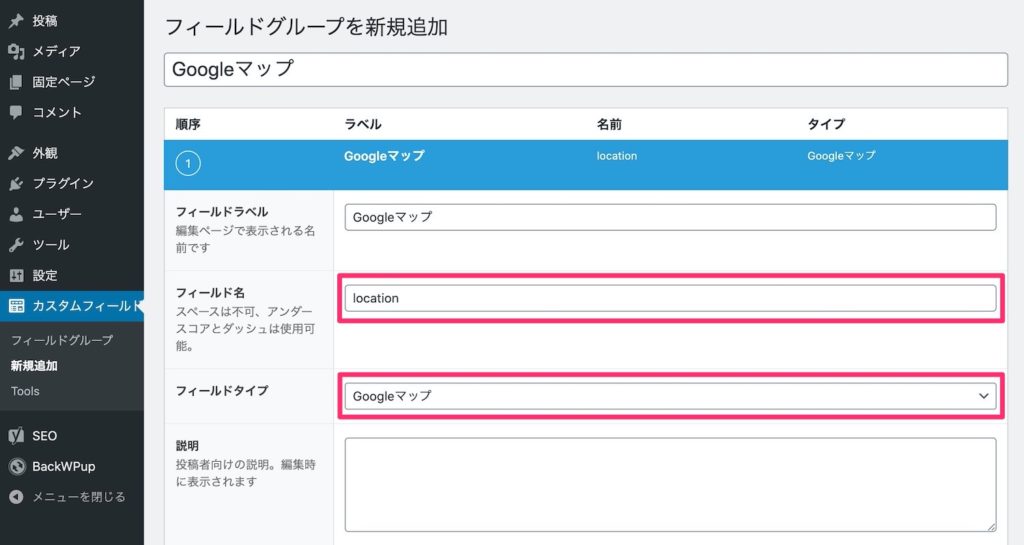
カスタムフィールドのフィールド名を「location」にして、フィールドタイプから「Googleマップ」を選択します。
設定を更新したら、投稿編集画面へ移動します。
投稿編集画面にGoogleマップのフィールドが追加されていると思われます。
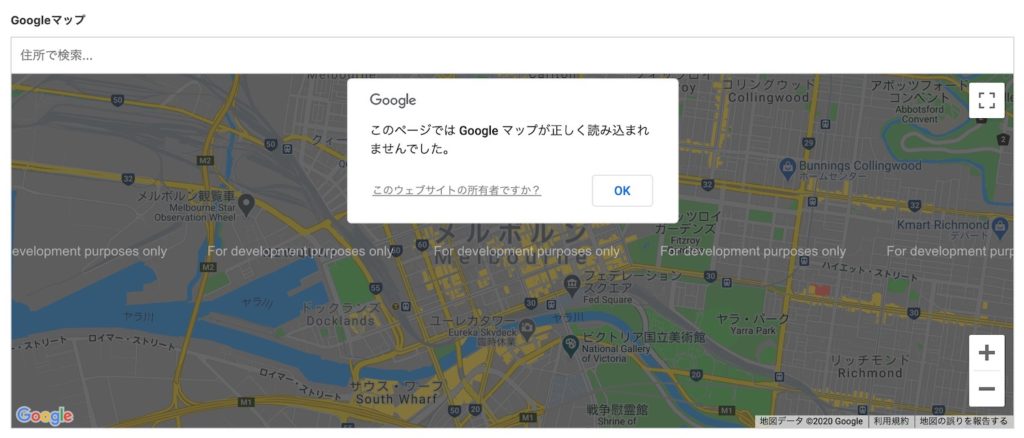
上記のように「このページでは Google マップが正しく読み込まれませんでした。」と表示される場合は、Google Maps Platformの「APIキー」を設定する必要があります。
設定方法は別記事で紹介していますので、こちらを参照ください。
【WordPress】Advanced Custom FieldsのGoogleマップでAPIエラーがでた時の対処法
PHP
<?php
$location = get_field('location');
if( $location ): ?>
    <div class="acf-map" data-zoom="16">
        <div class="marker" data-lat="<?php echo esc_attr($location['lat']); ?>" data-lng="<?php echo esc_attr($location['lng']); ?>"></div>
    </div>
<?php endif; ?>
「get_field(‘location’)」の「location」は、先ほどカスタムフィールドで設定したフィールド名を入れてください。
CSS
.acf-map {
    width: 100%;
    height: 400px;
}
.acf-map img {
   max-width: inherit !important;
}
「acf-map」というクラス名に、幅と高さのスタイルを与えます。
JavaScript
<script src="https://maps.googleapis.com/maps/api/js?key=APIキー"></script>
<script src="/js/googlemap.js"></script>
1行目の「APIキー」には、「Google Maps Platform」で生成したAPIキーを入れます。
2行目には次に紹介するGoogleマップを読み込むためのJavaScriptのディレクトリを記述します。
googlemap.js
(function( $ ) {

/**
 * initMap
 *
 * Renders a Google Map onto the selected jQuery element
 *
 * @date    22/10/19
 * @since   5.8.6
 *
 * @param   jQuery $el The jQuery element.
 * @return  object The map instance.
 */
function initMap( $el ) {

    // Find marker elements within map.
    var $markers = $el.find('.marker');

    // Create gerenic map.
    var mapArgs = {
        zoom        : $el.data('zoom') || 16,
        mapTypeId   : google.maps.MapTypeId.ROADMAP
    };
    var map = new google.maps.Map( $el[0], mapArgs );

    // Add markers.
    map.markers = [];
    $markers.each(function(){
        initMarker( $(this), map );
    });

    // Center map based on markers.
    centerMap( map );

    // Return map instance.
    return map;
}

/**
 * initMarker
 *
 * Creates a marker for the given jQuery element and map.
 *
 * @date    22/10/19
 * @since   5.8.6
 *
 * @param   jQuery $el The jQuery element.
 * @param   object The map instance.
 * @return  object The marker instance.
 */
function initMarker( $marker, map ) {

    // Get position from marker.
    var lat = $marker.data('lat');
    var lng = $marker.data('lng');
    var latLng = {
        lat: parseFloat( lat ),
        lng: parseFloat( lng )
    };

    // Create marker instance.
    var marker = new google.maps.Marker({
        position : latLng,
        map: map
    });

    // Append to reference for later use.
    map.markers.push( marker );

    // If marker contains HTML, add it to an infoWindow.
    if( $marker.html() ){

        // Create info window.
        var infowindow = new google.maps.InfoWindow({
            content: $marker.html()
        });

        // Show info window when marker is clicked.
        google.maps.event.addListener(marker, 'click', function() {
            infowindow.open( map, marker );
        });
    }
}

/**
 * centerMap
 *
 * Centers the map showing all markers in view.
 *
 * @date    22/10/19
 * @since   5.8.6
 *
 * @param   object The map instance.
 * @return  void
 */
function centerMap( map ) {

    // Create map boundaries from all map markers.
    var bounds = new google.maps.LatLngBounds();
    map.markers.forEach(function( marker ){
        bounds.extend({
            lat: marker.position.lat(),
            lng: marker.position.lng()
        });
    });

    // Case: Single marker.
    if( map.markers.length == 1 ){
        map.setCenter( bounds.getCenter() );

    // Case: Multiple markers.
    } else{
        map.fitBounds( bounds );
    }
}

// Render maps on page load.
$(document).ready(function(){
    $('.acf-map').each(function(){
        var map = initMap( $(this) );
    });
});

})(jQuery);
コードが長くなりますが、「Advanced Custom Fields」の公式サイトに記載されている通りに記述します。
functions.php
function my_acf_google_map_api( $api ){
    $api['key'] = 'APIキー';
    return $api;
}
add_filter('acf/fields/google_map/api', 'my_acf_google_map_api');
続いてfunctions.phpに上記コードを読み込ませます。
「APIキー」の箇所には、「Google Maps Platform」で生成したAPIキーを入れてください。
以上で設定は完了です。
「Googleマップ」フィールドの設定完了
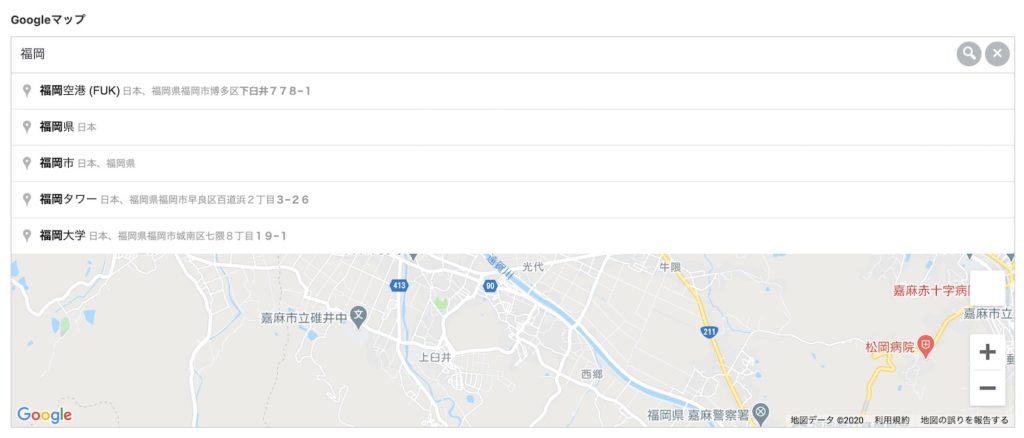
これまでの設定をすると行うと、上記のようにサジェスト機能が付いたGoogleマップのフィールドタイプが使えるようになります。
もしも「このページでは Google マップが正しく読み込まれませんでした。」と、エラーメッセージがでる場合は、途中で紹介したこちらの記事を参照してください。